How to Grout By BAL adhesives
How to Grout – Brought to you by BAL Adhesives and Grouts
Every beautiful tile needs a complimentary grout to make them stand out. To ensure the perfect finish to your tiling project, follow the below steps on how to grout:
Step 1 – Ensure your grout lines are clean
- When tiling a wall or floor, make sure your grout lines are clean and free from any excess tile adhesive as this can interact and discolour your adhesive.
- Clean any excess off the tile surface and grout lines using a damp sponge
- All grout lines should be clean, dry and free from loose debris.
Step 2 – Make sure your adhesive has fully dried
- Check the adhesive manufacturer’s instructions on set-time. Typically, ready-mixed adhesives like BAL WHITE STAR PLUS take 24 hours to set, rapid-setting adhesives such as BAL RAPID-FLEX ONE or BAL FLEX ONE anything from 3-6 hours, and standard sets such as BAL SINGLE PART FLEXIBLE from 16 hours plus.
- Remember set-times will vary depending on environmental conditions i.e. adhesives will set slower in cooler temperatures and quicker in hotter conditions.
Step 3 – Remove all spacers
- It is absolutely crucial to remove any spacers which are still embedded in your adhesive, or punch them fully into the tile adhesive bed before grouting.
- Failure to remove spacers before grouting, can lead to grout lines cracking.
Step 4 – How to grout porous tiles in hotter temperatures
- If grouting porous tiles in temperature above 25°C, dampen joints with clean water prior to grouting.
Step 5 – How to mix BAL grouts
- Using a mixing bucket, slowly add the powder to clean cold water at a ratio as per the bag instructions.
- Mix using a bucket trowel or electric drill mixer at a slow speed (under 300rpm) until lump-free mortar is achieved.
- Allow the mixed grout to stand for 2-3 minutes before remixing for 30 seconds. Avoid entraining air by mixing at a two high speed or by over mixing.
Step 6 – Check potential staining risks
- Apply grout to a few tiles in a small trial area. If discolouration occurs, or difficulties are encountered with cleaning off (surplus grout), apply BAL PROTECTIVE SEALER and repeat the trial.
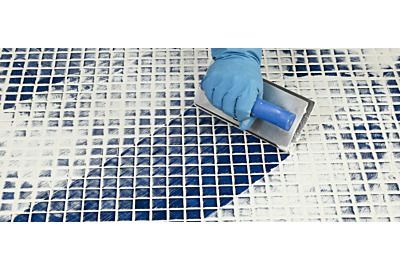
Step 7 – How to apply the grout
- Work in small areas with a grout float or squeegee, holding it at 45° Completely fill the tile joint with mixed grout and compact well, removing any excess grout from the tile surface as work proceeds.
- Allow the grout to dry until it is touch dry (not fully set/cured). This can be anything up to 20 to 30 minutes.
- Using a dampened sponge or sponge board, clean surface diagonally to the grout lines. Rinse out the sponge/sponge board frequently with clean water – do not over wash!
- Do not allow water to enter un-grouted joints.
- When the grout has sufficiently set in the joints, polish the tile surface with a clean, dry cloth.
Step 8 – Final clean down
- Clean any remaining light haze from the surface the next day using water and an emulsifying pad.
- Wait a minimum of 24 hours before subjecting tiles to normal service conditions.
- If grouting a shower, do not use the shower for at least 2 weeks as per British Standards.
- We have a great range of cleaning products from Lithofin to clean eccess grout and adhesive off your newltyy laid floor or even to just make old tiles sparkle. See the entire grout and tile cleaning and aftercare range here
Product Focus
BAL Micromax2
Rapid-setting and highly flexible wall and floor grout, BAL Micromax2 is formulated with built-in Microban antimicrobial protection for walls and floors. Suitable for joint widths from 1mm to 20mm, BAL Micromax2 sets in two to three hours, enabling faster completion. An efflorescence-free formulation minimises risk of patchy discolouration. A built in admixture ensures a clean and even finish for grout joints. It is available in a range of 20 colours. Mix with approximately 5 parts powder to 1 part water.Click here to see the BAL Micromax 2 grout range
BAL Grout Flex
Suitable for wall joints up to 5mm, BAL Grout Flex has a built-in admixture for increased flexibility and high bond strength at the edges of tiles or mosaics. Coming in five key colourways – White, Jasmine Cream, Light Grey, Mid Grey and Dark Grey, BAL Grout Flex is perfect for grouting porcelain, glazed and fully vitrified tiles, glass and ceramic mosaics, marble and natural stone.Click here to see the BAL Grout Flex range
Water to powder mixing ratio for BAL Grout Flex 1.5 to 1.7 ltrs for a 5kg bag and 3 to 3.4ltr for a 10kg bag.
BAL Grout Flex Wide Joint
BAL Grout Flex Wide Joint is a water and frost resistant cementitious wide joint tile grout for walls and floors and is suitable for joint widths from 3mm to 20mm. Suitable for grouting ceramics, mosaics and natural stone/quarry tiles, in dry or wet interior and exterior environments, Wide Joint also comes in White, Jasmine Cream, Light Grey, Mid Grey, and Dark Grey.Click here to see the BAL Grout Flex Wide Joint range.
Water to powder mixing ratio for BAL Grout Flex Wide Joint is 0.95ltrs for a 5kg bag and 1.9ltrs for a 10kg bag.